At some point in time, a reversal of roles between mothers and daughters happen. My mother used to take me to places when I was young. Now I take her to places. It took sometime before this happened but the reversal of roles between me and Princess One occurred after 9 years - sooner than anticipated. The reversal of roles I'm referring to is her being my mentor in this crafting project. I let her walk me through all the steps to create this Lasting Friendship Bracelet tutorial, which I'm also sharing with you. I love naming projects and so this is called operation Lasting Friendship Bracelet tutorial.

Crafty jewelry: Friendship Bracelet, very easy Tutorial
Materials needed:
Beads with large openings
Hemp cord
Tape (painter's tape is used in this case)
Cardboard

Crafty jewelry: Friendship Bracelet, very easy Tutorial
Materials needed:
Beads with large openings
Hemp cord
Tape (painter's tape is used in this case)
Cardboard


You'll need the cardboard to make a loom. Cut any cardboard into a strip about 3 inches wide and 11 inches long. Cut two slits on both ends approximately half an inch away from each other.

Measure your wrist.

Whatever the size is, add 12 inches then cut 2 strips of hemp cord with this length. For example, Princess One's wrist is 7 inches in diameter so by adding 12 inches, we have a total length of 19 inches. Cut two 19-inch strips of the hemp cord.

Insert the hemp cords on the slits of the loom, making sure that approximately 6 inches of the cord are left hanging.

Tape these cords at the back of the loom to look like this. They are named Cord 1 and Cord 2.

Cut another hemp cord, called Cord 3, with a length double of Cord 1. Since in this case Cord 1 is 19 inches, Cord 3 should be 38 inches. Tie the end of Cord 3 to Cord 1 with a simple knot, leaving a tail of about 6 inches, then tucking its tail on the slit for Cord 1.

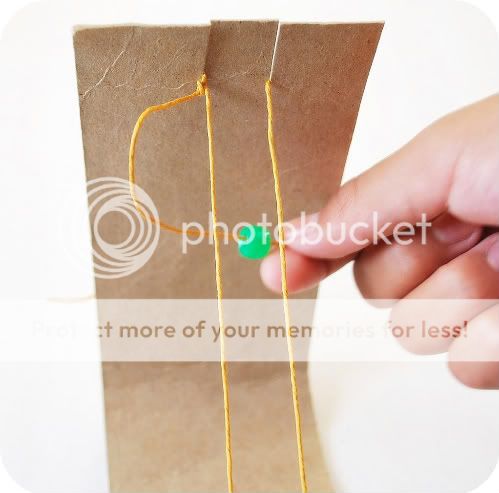
Pass through Cord 3 under Cord 1 and Cord 2, then insert a bead.

Make sure that the bead stays in the middle of Cord 1 and Cord 2.

Pass Cord 3 over Cord 2 going towards the bead, then insert it in the bead. By now, Cord 3 should be on the left side and the bead is snug.

To add the next bead, pass Cord 3 under Cord 1 and Cord 2 towards the right like the step did with the green bead.

After that, you're ready for your next bead.

Here's a little pictorial summary of the steps done earlier.


When you have reached the desired length, close the bracelet by tying the ends in a knot.

Make a clasp using another bead that you can easily slide up and down to close or loosen the bracelet.

Knot all the ends of the hemp cord and now you have a Lasting Friendship bracelet.

These are the bracelets we made together. It took us around 20 minutes to complete these beauties and it's so worth it!

How about you?

Không có nhận xét nào:
Đăng nhận xét