

Gift presents for women: Pattern-Free Women's Halter Top with Built In Bra
Sewing patterns
A couple of pregnancies and gravity can lead to what my best friend calls oranges in nylons. Conjures up a pretty picture, doesn't it? I've been relcutantly avoiding halter tops for years, but last night I figured out how to make one with a shelf bra liner.

Think of it as three easy pieces: THE NECK STRAP
 THE ELASTICIZED BACK
 and THE FRONT

THE ELASTICIZED BACKand THE FRONT Cut two of each piece in the photo below: Top 2 pieces - for halter strap - appx. 12 inches long and 2 inches wide (each)
Middle 2 pieces - body of halter top. If your bust measures 36 inches, cut these two pieces about 39 inches wide (to allow for seams and so the top isn't too tight). They should be long enough to cover your belly. **If your belly and/or hips are much wider than your bust, cut a-line shaped pieces rather than squares so that the shirt will not be too snug on your hips.
Bottom 2 pieces - (optional) bottom band. They are the same width as the middle piece (see disclaimer above) and about 6 inches tall - they will be folded in half to form the bottom band of the shirt.

First, fold those two bottom bands in half and sew onto the bottom of the shirt front and shirt back. You now have one front shirt piece and one back shirt piece.
Set the back aside. THE FRONT: Fold in half sideways. Take a small dinner plate or other round object and place as shown over the cut edge (not the folded edge).
Mark the shape of the plate with a pencil. We are cutting out the curve under the arm. Note how I didn't exactly follow the circular shape of the plate all the way. Cut yours similarly.
When you open the shirt front up, it will look like this:
Lay the front down. Take your BACK piece which is still a big square and lay it over top of the front, matching up the bottom hems. Here I have folded down the back at exactly where it meets the underarm curve. See all that red fabric facing you? That is going to become a casing for the elastic at the back. I trimmed mine a little so the casing wouldn't be bulky and huge...
... made sure my casing was wider than my elastic, and sewed the casing. The elastic needs to be about 2 inches shorter than the casing in order to gather the fabric nicely.
 When I threaded my elastic through the casing, it looked like this (below). Stitch the elastic in place at both ends. It will later be stitched into the side seams for stability.
Middle 2 pieces - body of halter top. If your bust measures 36 inches, cut these two pieces about 39 inches wide (to allow for seams and so the top isn't too tight). They should be long enough to cover your belly. **If your belly and/or hips are much wider than your bust, cut a-line shaped pieces rather than squares so that the shirt will not be too snug on your hips.
Bottom 2 pieces - (optional) bottom band. They are the same width as the middle piece (see disclaimer above) and about 6 inches tall - they will be folded in half to form the bottom band of the shirt.
First, fold those two bottom bands in half and sew onto the bottom of the shirt front and shirt back. You now have one front shirt piece and one back shirt piece.
Set the back aside. THE FRONT: Fold in half sideways. Take a small dinner plate or other round object and place as shown over the cut edge (not the folded edge).
Mark the shape of the plate with a pencil. We are cutting out the curve under the arm. Note how I didn't exactly follow the circular shape of the plate all the way. Cut yours similarly.
When you open the shirt front up, it will look like this:
Lay the front down. Take your BACK piece which is still a big square and lay it over top of the front, matching up the bottom hems. Here I have folded down the back at exactly where it meets the underarm curve. See all that red fabric facing you? That is going to become a casing for the elastic at the back. I trimmed mine a little so the casing wouldn't be bulky and huge...
... made sure my casing was wider than my elastic, and sewed the casing. The elastic needs to be about 2 inches shorter than the casing in order to gather the fabric nicely.
When I threaded my elastic through the casing, it looked like this (below). Stitch the elastic in place at both ends. It will later be stitched into the side seams for stability. 
Here is the finished back laid over the unfinished front:

To make the built in bra, I amputated a black tshirt and made a facing for the bust of the shirt front. If you have never added a facing before all it is is piece of fabric cut exactly the same as the main shirt front (only in this case, it is not as long as the main shirt front).  Before attaching the black facing to the main shirt front, stitch a piece of elastic across the bottom of the facing to gather it. Now place the black facing on the right side of the shirt and sew the top and both arm edges to the main shirt front. Leave the bottom (elastic edge) just hanging.
Before attaching the black facing to the main shirt front, stitch a piece of elastic across the bottom of the facing to gather it. Now place the black facing on the right side of the shirt and sew the top and both arm edges to the main shirt front. Leave the bottom (elastic edge) just hanging. Turn the facing to the inside and press in place with an iron. 
Take the top of the shirt front and fold it down inwards to make a casing. This casing has to be wide enough to fit the halter strap through. Stitch the casing in place.
Take the top of the shirt front and fold it down inwards to make a casing. This casing has to be wide enough to fit the halter strap through. Stitch the casing in place.
View from the outside:
HALTER STRAP: fold each strap piece in half, then fold each edge in to the centre. Iron and fold in half again.

Take the two straps and attach them at one end to make one long continuous piece. Don't worry about being too neat about attaching the ends together. This part will be hidden in the casing we just made.
Finish the other two ends.

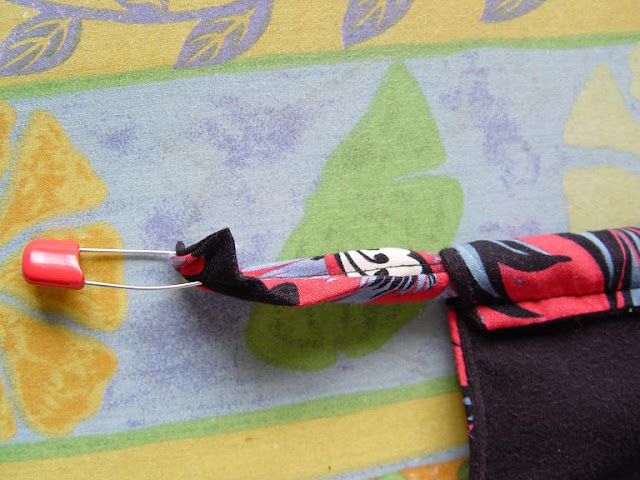
Using a safety pin, feed the halter strap through the casing.
Gather the front and stitch in place on both sides where I'm pointing to hold the gather in place.

Lastly, with good sides together, sew the front to the back down the side seams.
 Finished front view:
Yay! Another something for *me*!

Sourrce: sewingdork.blogspot.com


Không có nhận xét nào:
Đăng nhận xét